What It Means to Build for Yourself
Building something with your hands changes how you see it. It’s not just a table. It’s a reminder of the tree it came from, the work it took to carry it home, the cold mornings shaping it outside the shed.
I’ve built a lot of things over the years — cabins, decks, tool chests — but something hits different when you make a piece for your own space. No deadlines. No budget meetings. Just you, your tools, and the material. It either works or it doesn’t. No one’s there to fix it for you.
That cedar slab had been sitting behind my workshop for a year and a half. I’d planned to make a bench from it, then forgot about it. It wasn’t until I needed a sturdy work surface for sharpening blades and assembling small jigs that I finally dragged it inside.
Out here, everything starts with need. You don’t build because it looks nice in a catalog. You build because you’ve got something to do and nowhere else to do it.
Scouting and Prepping a Cedar Slab
The slab came from a red cedar that had split near the base during a storm. I cut it down the middle with a chainsaw mill and let both halves dry under cover. This one was the better half — less checking at the ends, flatter overall.
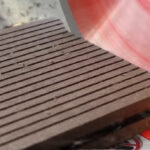
Before anything, I took a wire brush to it to knock off moss and bark remnants. Then I sighted it edge-on to see how true it ran. One end was cupped about 3/8 of an inch. I marked the high spots with a pencil and went at them with a scrub plane.
Some folks chase flatness like it’s a competition. I just needed it flat enough to sit tools on without them rolling off. Once the edges were cleaned up, I hand-planed the surface to knock down the ridges. Took about an hour. My forearms burned, but it was the kind of burn that feels right — like you’re earning something.
You don’t fix a slab with a machine. You fix it with your body and your patience. That’s how you get to know it.
Shaping the Tabletop by Feel
There were knots and sap pockets and even one old beetle track. I left them all. They tell the story of the wood. The only thing I patched was a split near the corner — I inlaid a thin wedge of pine and pinned it with a dowel. Took five minutes. Held like a charm.
I rounded over the corners by eye with a rasp. No templates, no jig. Just kept working until it felt nice in the hand. That’s something people miss when they follow strict plans — how it feels to touch, to lean on, to use daily.
This wasn’t a piece of art. It was going to hold lumber, serve tea, and catch grease from my vise. I didn’t want a showroom finish — I wanted something that could take a hit and shrug it off.
Furniture doesn’t have to be precious to be meaningful. Sometimes the most valuable piece in the shop is the one with the most dents.
Legs from Salvage: Function Over Fashion
The legs came from an old fence I helped tear down last fall. Cedar again, gray on the outside, gold inside once planed. I cut them to about 30 inches, eyeballed the angle of splay at around 5 degrees, and marked everything with a carpenter’s pencil — no tape measure in sight.
I drilled through the slab and set the tenons in dry. Each leg got a shoulder to rest against the underside of the slab. Once seated, I drove oak wedges into kerfs cut at the top of each leg. That locked them in tight.
To keep the legs from racking, I ran a horizontal brace between each pair. Nothing fancy — just half-lap joints cut with a handsaw and chisel. Screwed and pegged in place. Once that was in, the whole thing felt like a tree trunk.
When the materials already have a past life, you don’t waste them. You find the next use, and you make it count.
Solid Joinery Without Glue or Screws
I’m not against screws. I just don’t think they’re always necessary. This bench is held together by gravity, tension, and careful cuts.
The joinery is visible. You can walk around the table and see exactly how it’s built. That’s important to me. I’ve seen enough builds hidden behind veneers and fasteners that never invite inspection. This one does. You can see the wedges. You can feel the joints. And if something ever loosens, you know exactly how to fix it.
The only metal in the build are the screws holding the stretchers — and even those I might swap out for dowels one day when I’ve got the time.
If you build it to last, you have to build it like someone might need to take it apart again. That’s real sustainability.
Finishing the Top for Real Use
After sanding off the last of the planer marks with 120 grit, I wiped the slab down with a tack cloth and applied a heavy coat of boiled linseed oil. It soaked it up like a sponge. I left it overnight, wiped off the excess, then applied a second coat the next day.
The oil brought out the reds and purples in the heartwood and left a low-sheen finish that doesn’t feel sticky or too polished. It’s easy to touch up, too — once a year, maybe, depending on the climate and how much you use it.
I’ve spilled glue, water, and even coffee on it. No swelling. No complaints. Just character.
The best finish isn’t the one that shines — it’s the one you can live with and not baby.
Why This Table Matters
This table doesn’t look like much. But it’s where I now sit to sharpen chisels, write in my notebook, eat lunch when it’s raining. It’s already got scratches and burn marks. It fits into my life like it was always meant to be here.
I built it without plans, without fuss, and without buying a thing. That’s something I wish more folks would try. Not because it’s cheaper (though it is), but because it teaches you something useful. About tools. About patience. About letting materials lead.
That slab had been waiting a long time. All it needed was a reason to become something.